Posts

Showing posts from 2017

Miscellaneous Upates

Image
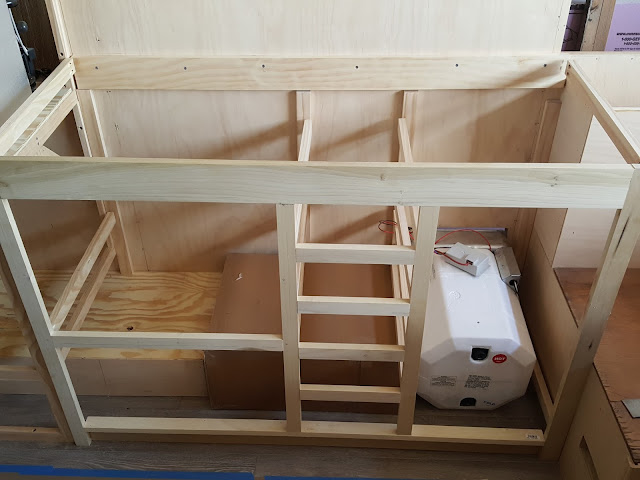
A Little of This and That Things slowed down for a while with the approach of Thanksgiving and Christmas holidays.  We typically travel quite a bit to see family and friends this time of year, so work periods have been fewer and farther in between. We did frame up the interior wall of the bathroom.  This is at the far rear of the trailer.  This is the last piece we need to build before we can "button up" the back of the trailer.  Once that is done and we put the roof on, we can then get an accurate measure around the circumference of a side wall.  This is a key dimension that  Hemet Valley RV needs from us before we can order sheet metal. Our high-level construction timeline is this: Button-up rear of Trailer Install roof panels Install roof truss Add the block-and-plywood curvature trim pieces (seen in the demolition posts). Get accurate measurement of exterior wall circumference. Order sheet metal Work on running electrical while waiting on sheet metal Work

Closet and Refrigerator Cabinet Framing

Image
Into the Closet Next in line after the galley cabinet is the closet/refrigerator cabinet.  We're planning on a 3.5 cubic foot fridge that will be mounted in the closet.  Again, taking into account our relative height; we placed the fridge at a convenient height. The closet and galley cabinets are interconnected; so we could not do the final install of the galley until we got this closet done. Here's a timeline of the closet build... Framing. Checking galley cabinet fit. Checking refrigerator fit. Install of side panel. Connecting it all Together... Once we were reasonably happy (when is it ever perfect?) we connected everything together.  Here's what it looks like from the front of the camper looking towards the rear.

Galley Construction - Part II

Image
Galley Installation With the dinette benches in place, we proceeded with install/anchoring of the galley cabinets.  Here's a few shots of the install.  Also, we checked and double checked the fit for the 6-gallon hot water heater and the 15-gallon fresh water tank.  Oh...and the water pump that will be located in the cabinet too.  We're cramming as much in here as possible to have room for storage of other items under the dinette benches and in cabinets. The cardboard box is a mock-up of the size of the 15-gallon water tank.  We wanted to be sure that if we had to remove the tank in the future, we could get to it by taking out the microwave, lifting out the shelf for the microwave, and accessing the tank from there.  It looks like the plan will work. Instead of 5 drawers, we'll have 4.  The lower drawer will be false front, since the water tank will be in the way. The wooden box you see on the left side of the picture is a cover for the wheel well.  Underneath,

Dinette Bench Construction - Part II

Image
Dinette Bench Contstruction Now that the flooring was complete, we could install the dinette and galley and get them anchored to the floors and walls properly. Benches First Both benches installed.   Close up of street side bench.  This one is wider than the curb-side bench, so the middle slat needs extra support. Curb-side bench.  The original bench top is sitting on the new bench base.  Perfect fit.  :-) Here's the dinette area benches with the street-side bench back that doubles as storage installed.  I placed the original table top in the area to get an idea of how everything was fitting.

Flooring First!

Image
Plank Flooring For the Camper Realizing that the dinette benches and the galley cabinets would require soffits to be placed on the walls...and further realizing that the thickness of the floor covering would dictate where these soffits needed to be placed...we set about selecting flooring. This took a while . We ended up with a glue down plank flooring that simulated wood.  When we finally agreed on a product, ordered it, and had it in hand we then had to figure out a pattern that we liked.  We tired a few of the suggested patterns; but finally decided that what we liked best was a totally random pattern.  We also had to take into account the horizontal placement of the planks: you don't want to have to lay a super thin slice along one wall or another.  Here's a couple of photos where we were laying out options: Checking horizontal alignment. If this was brick work; I think this layout is called "running bond". Final Flooring Insta

Galley Construction - Part I

Image
Galley Considerations In the original camper, the cooktop was located on the right side of the galley (towards the front of the camper).  This put it right next to the dinette.  We looked at this arrangement and decided we weren't comfortable with fire, frying pans, and the potential for hot water and splattering grease to be next to a bench where kids might be sitting.   So, we decided to rearrange the galley. We also wanted to add a few convenience items.  Our new galley would have the following: Sink Three-burner gas stove Built-in convection microwave Hot water heater (under sink) 15 gallon water tank Microwave Regarding the microwave; we visited an airstream dealer and saw a built-in convection unit.  It was a essentially a Cuisinart counter top model, with a custom stainless steel vent/surround.  See the picture of the set up in an Airstream (to the right). The microwave itself was available on a lot of different web sites.  I think we got ours from Best Buy.

New Dinette Benches

Image
First in Line: The Dinette The first thing after the front wall, is the dinette.  Following on the (relative) success of copying the old walls, we began re-manufacturing the dinette benches.  We pretty much copied the old design exactly.  The frame members were primarily 1" x 1" dowels. Modifications We did modify the street-side dinette to accommodate a combination propane/carbon dioxide leak detector, and also the power-center for the camper.  Did a little extra work to "counter-sink" the power center so that hopefully it does not get kicked by heels of folks sitting at the dinette (think 5 to 12 year olds that can't stop fidgeting). The street-side dinette bench framing. Bench; with propane/co2 leak detector and the power center installed. 30-AMP Load Center

Raising the Walls & Front Panel

Image
Raising the Walls & Adding Front Panel Having learned a thing or two with the first wall, I constructed the second one a little quicker than the first, and adopted a slightly different technique.  After that, I conned a friend into helping me lift the walls onto the trailer, brace them, and attach them to the floor and trailer frame.  I again used anchor bolts that passed through the floor and in some places the trailer frame as well. Yes.  That's John helping me with the wall...and a porta-potti that is doubling as a step stool.  All puns intended. (Sorry John, couldn't pass it up.) The Cree behind our Tundra.  Gives you an idea of the size. Front Panel The layout of just about everything in the trailer is based off of the front wall; so we put the front panel on to act as a datum.  This was pretty exciting because the trailer really started to look like something.   Old Benches - New Wall Just for fun, I brought the old benches from th

Walls!

Image
Building The Walls Using the old walls as a template, we began laying out the new walls.  We decided to make the new trailer about 3" taller than the old once, since I'm 6'3" tall.  This was pretty straightforward *EXCEPT* for the curvature at the back of the trailer.  The front of the trailer was easy, because we simply elongated a vertical piece.  But the back of the trailer didn't have a vertical surface, so we had to elongate the curvature.   Layout Here I've fastened the original lumber to a new 2" x 8" piece of lumber.  In this picture, I've separated the last joint a little to account for the taller trailer.  This is how I "stretched" the curvature on the back of the trailer. Old trailer framing screwed onto a new 2" x 8" board. All Hail Larry! Here I am cutting out the curved frame pieces using a technique I picked up from Larry at cannnedhamtrailers.com  If you have not visited his website; I high

Finally: Something To Build Upon

Image
Trailer Floor Having assembled the belly pan on the trailer frame, we put the floor joists together, put in insulation, and then put the plywood on top.  The insulation was 3" think foam.  The floor of the trailer consist of the following: 1. Galvanized steel belly pan 2. Plastic moisture barrier 3. Floor joists (2" x 3"s) 4. Insulation 5. 3/4" Plywood You can see the various "layers" of the floor in this shot. Here's the new fully assembled floor. Flush anchors bolted through the joists, plywood, and trailer frame. Mapping It Out Here's the floor, with approximate location of major furnishings mapped out in blue tape.

Star Sheet Metal & New Belly Pan

Image
Old School We had to cast about for a while before finding a sheet metal shop that was willing to work with us on what we needed.  We had a few false-starts...and then the clouds parted, the sun came out, and birds began to sing.  We found: Star Sheet Metal in Irving, Texas.  More importantly; we found Henry Cordova...the shop foreman.  Henry is a cool cat...and was in to our project.   Start Sheet Metal is old school.  No website.  No social media presence...but busy as all get out because of word-of-mouth.  Here's what you'll find if you look 'em up on Google: Star Sheet Metal   Sheet metal contractor in Irving, Texas Address: 200 E Pioneer Dr, Irving, TX 75061 Phone: (972) 438-5056 New Belly Pan Henry and team set about fabricating metal for us to use as a new galvanized steel belly pan to protect the bottom of the camper.  They used the trailer as a template, and then secured the metal pieces for transport using strips of wood and some screws th