Posts

New Dinette Benches

Image
First in Line: The Dinette The first thing after the front wall, is the dinette.  Following on the (relative) success of copying the old walls, we began re-manufacturing the dinette benches.  We pretty much copied the old design exactly.  The frame members were primarily 1" x 1" dowels. Modifications We did modify the street-side dinette to accommodate a combination propane/carbon dioxide leak detector, and also the power-center for the camper.  Did a little extra work to "counter-sink" the power center so that hopefully it does not get kicked by heels of folks sitting at the dinette (think 5 to 12 year olds that can't stop fidgeting). The street-side dinette bench framing. Bench; with propane/co2 leak detector and the power center installed. 30-AMP Load Center

Raising the Walls & Front Panel

Image
Raising the Walls & Adding Front Panel Having learned a thing or two with the first wall, I constructed the second one a little quicker than the first, and adopted a slightly different technique.  After that, I conned a friend into helping me lift the walls onto the trailer, brace them, and attach them to the floor and trailer frame.  I again used anchor bolts that passed through the floor and in some places the trailer frame as well. Yes.  That's John helping me with the wall...and a porta-potti that is doubling as a step stool.  All puns intended. (Sorry John, couldn't pass it up.) The Cree behind our Tundra.  Gives you an idea of the size. Front Panel The layout of just about everything in the trailer is based off of the front wall; so we put the front panel on to act as a datum.  This was pretty exciting because the trailer really started to look like something.   Old Benches - New Wall Just for fun, I ...

Walls!

Image
Building The Walls Using the old walls as a template, we began laying out the new walls.  We decided to make the new trailer about 3" taller than the old once, since I'm 6'3" tall.  This was pretty straightforward *EXCEPT* for the curvature at the back of the trailer.  The front of the trailer was easy, because we simply elongated a vertical piece.  But the back of the trailer didn't have a vertical surface, so we had to elongate the curvature.   Layout Here I've fastened the original lumber to a new 2" x 8" piece of lumber.  In this picture, I've separated the last joint a little to account for the taller trailer.  This is how I "stretched" the curvature on the back of the trailer. Old trailer framing screwed onto a new 2" x 8" board. All Hail Larry! Here I am cutting out the curved frame pieces using a technique I picked up from Larry at cannnedhamtrailers.com  If you have not visited his website; I high...

Finally: Something To Build Upon

Image
Trailer Floor Having assembled the belly pan on the trailer frame, we put the floor joists together, put in insulation, and then put the plywood on top.  The insulation was 3" think foam.  The floor of the trailer consist of the following: 1. Galvanized steel belly pan 2. Plastic moisture barrier 3. Floor joists (2" x 3"s) 4. Insulation 5. 3/4" Plywood You can see the various "layers" of the floor in this shot. Here's the new fully assembled floor. Flush anchors bolted through the joists, plywood, and trailer frame. Mapping It Out Here's the floor, with approximate location of major furnishings mapped out in blue tape.

Star Sheet Metal & New Belly Pan

Image
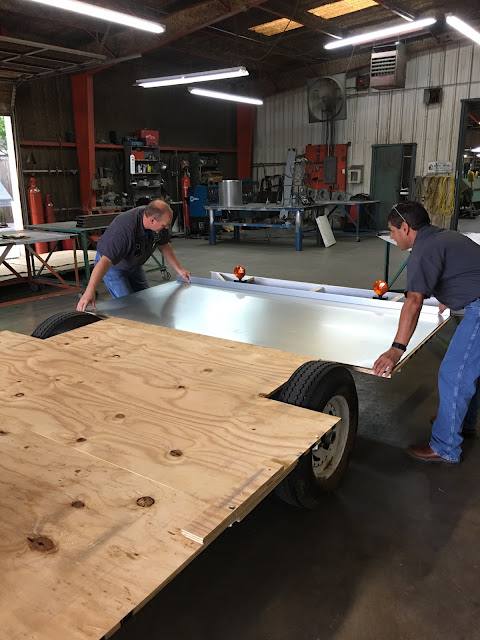
Old School We had to cast about for a while before finding a sheet metal shop that was willing to work with us on what we needed.  We had a few false-starts...and then the clouds parted, the sun came out, and birds began to sing.  We found: Star Sheet Metal in Irving, Texas.  More importantly; we found Henry Cordova...the shop foreman.  Henry is a cool cat...and was in to our project.   Start Sheet Metal is old school.  No website.  No social media presence...but busy as all get out because of word-of-mouth.  Here's what you'll find if you look 'em up on Google: Star Sheet Metal   Sheet metal contractor in Irving, Texas Address: 200 E Pioneer Dr, Irving, TX 75061 Phone: (972) 438-5056 New Belly Pan Henry and team set about fabricating metal for us to use as a new galvanized steel belly pan to protect the bottom of the camper.  They used the trailer as a template, and then secured the metal pieces for transport us...

First Things First

Image
The Bottom Issue The first thing in the trailer build, and something I wanted to improve upon, was the underbelly.  The original camper used a sheet of asphalt board as the protection for the bottom of the trailer.  I'm guessing it lasted okay for the first ten years...but after I got it, over 50 years later...it was shot. Front, curb-side, lower corner of trailer showing extensive damage to the asphalt board and exposure of the insulation...in which some critter had made a cozy home. Temporary Deck Knowing that we were going to have to haul whatever materials we purchased for the new belly pan, we first installed a temporary deck on the trailer. We used 3/4" plywood, with the intention that this would eventually end up being our trailer floor. Temporary Deck

Makeshift Workshop

Image
Public Storage to the Rescue Now that we had something viable to build upon, it was time to get serious.  Erin found a Public Storage location that was willing to rent us a 14' x 30' locker to use as a workshop.  The gal that ran it was kinda enamored with the idea of a vintage camper, I guess. Workshop Our humble workshop. Workbench made from saw horses an a blank solid door panel.

A Visit to Powder Coating Shop

Image
New Look for Old Frame After DFW Welding Services fixed up the frame from a structural standpoint, Tim delivered the trailer to North Texas Powder Coating so she could be sand blasted and given a nice new white powder coating. On The Rack at North Texas Powder Coating Back to DFW Welding Services After the powder coating was complete, Tim ordered and installed a new 6,000 lb. axle with all new electric trailer brake set up.  Here it is at Tim's shop. Finally Back Home! After several months, the trailer with new axle and brake system was back home...I could finally start BUILDING!

Time for Welding

Image
Off to the Welding Shop Having exposed the trailer frame, we were able to assess what needed to be fixed.  The brake drums clearly had "something" rolling around in them.  Upon removal of the drum, I found the brake pad adjustment mechanism had failed, and parts had been rolling around for some time...getting a sort of polishing. Remember those rock tumblers you used to see as a kid that would convert ragged chunks of unattractive slag into the Hope Diamond?   That's pretty much what was going on inside the brake drums, except with asbestos and steel.  Nothing you'd hang on a necklace. So, we towed the trailer over to DFW Welding Services , where Tim assured us that everything could be fixed...and that he could even add on a 2" receiver hitch. Before... Overview Back of the brake drum, and shote of drop axle. Not much better looking from this angle... After... Tim and his team did nice work for us, although our project seemed to ge...